
If you’ve ever been asked about your microscope cameras, you know this question is coming: “What is the magnification of this camera?”
It seems like a simple, logical question. However, giving a single number is one of the biggest mistakes you can make. Why? Because it’s based on a common misconception.
Here, we’ll clear up the confusion, explain how digital microscope magnification truly works, and guide you toward the specifications that actually matter for achieving stunning, detailed images.
The Short Answer: The Camera Doesn’t Provide Magnification
Let’s clarify this immediately: A microscope camera itself does not have a magnification power.
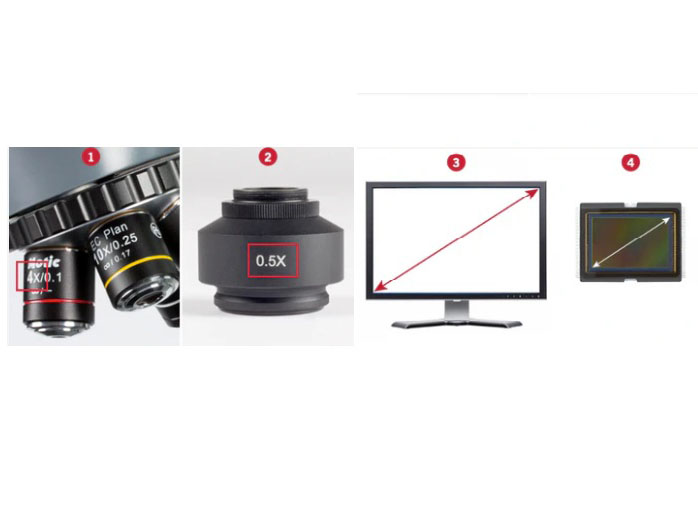
The final magnified image you see on your computer screen is the result of a collaboration between three key components:
- The microscope objective lens
- The microscope optics (eyepiece tube and any additional lenses)
- The camera sensor
The camera’s job is not to magnify, but to capture the image that the microscope’s optical system has already produced. Thinking of the camera as the source of magnification is like thinking your computer monitor is the source of a movie’s story—it’s just the display.
The Long Answer: How Digital Microscope Magnification Really Works
To understand the final magnification, you need to follow the imaging chain.
1.The primary source: The objective lens
This is the true hero of magnification. The objective lens (e.g., 4x, 10x, 40x, 100x) performs the first and most critical stage of magnification. This number is the foundation for all calculations that follow.
2. The Camera’s Role: Capture, Don’t Magnify
The camera sensor (CMOS or CCD) captures the image projected by the objective. The physical size of this sensor is crucial.
A larger sensor will capture a larger area of the projected image (a wider field of view), while a smaller sensor will capture a smaller, more “cropped” area.
An analogy: Imagine using different smartphones to take a photo through a telescope. The telescope (the objective) is doing the magnification. But how big the moon appears on your phone’s screen depends on your phone’s camera and screen size. The microscope camera is that smartphone.
3. The Final Calculation: Total Visual Magnification
The total magnification you see on your screen is calculated using this formula:
Total Magnification = Objective Magnification x Adapter Lens Magnification x (Screen Diagonal / Camera Sensor Diagonal)
This is a complex and somewhat theoretical calculation. The screen size variable makes it impractical, as every user has a different monitor. This is precisely why a single magnification number for a camera is meaningless.
Stop Focusing on Magnification! Here’s What Actually Matters.
When a customer asks about magnification, their real question is: “Will I be able to see clear details of my sample?”
Magnification without clarity is useless. Empty magnification is when you zoom in but see no new detail, just a blurrier image. Therefore, you should guide the conversation toward these critical camera specifications:
1. Resolution (Megapixels)
This is arguably the most important spec. Higher resolution (e.g., 5MP vs. 2MP) means more image detail. A high-resolution camera ensures you can resolve all the fine details your microscope’s optics can provide. It allows you to digitally zoom on your computer while still maintaining clarity.
2. Sensor Size
Often overlooked but vital. Sensor size (e.g., 1/1.2”, 2/3”, 1”) determines the field of view and influences low-light performance. A larger sensor typically provides a wider field of view and better image quality.
3. Pixel Size (µm)
Larger pixels can capture more light, leading to better performance in low-light conditions, higher dynamic range, and reduced noise. This is critical for fluorescence or other low-light applications.
4. Frame Rate (FPS)
If you are observing live cells or moving samples, a high frame rate (e.g., 30 FPS or higher at full resolution) is essential for smooth, real-time viewing without lag.
5. Software Features
The right software can be a game-changer. Look for features like:
On-screen measurement tools: Add scalable digital rulers to measure particles, cells, or defects directly on the image. This is far more valuable than a magnification number.
Image enhancement: Tools for stitching, HDR, or noise reduction.
Easy calibration: Simple workflows to calibrate the system for accurate measurements.
Next time a customer asks, “What’s the magnification?”, use it as an educational opportunity.
“That’s a great question. The camera itself doesn’t have a magnification number. The final view on your screen comes from your microscope’s objective and the camera’s sensor. For example, this 5MP camera will ensure you see all the fine detail that your 40x objective can resolve. More importantly, our software lets you take precise measurements directly on the image, which is much more useful than a magnification figure. What type of samples will you be working with most often? I can recommend a camera with the perfect sensor and resolution for your needs.”
This approach establishes you as a trusted expert, not just a salesperson, and ensures the customer gets the right product for their application.